Reviews
Sewing machine attachments for people who want the details
Shank types, attachment families and fit rules for vintage sewing machines, with a comparison of what each family does and which ones beginners waste money on.
What to take away
- Sewing machine attachments run on shank type. Low, high, slant and proprietary do not interchange. A Singer Featherweight 221 takes low shank feet. A Singer 401A takes slant shank feet. A Bernina 530 takes Bernina's proprietary feet.
- Attachments were engineered products, and their patent classification is searchable. The Singer 160992 Automatic Zigzagger is one example.
- A foot that clips on is not necessarily a foot that clears the plate at full stitch width. A Dritz low shank snap-on adapter adds height under the needle bar.
- Boxed sets are cheaper per piece and usually contain three pieces you will never use. A generic 42-piece low shank set typically costs $25 to $40 and includes one usable zipper foot, one usable hemmer and many feet for machines you do not own.
Start with the shank, not the foot
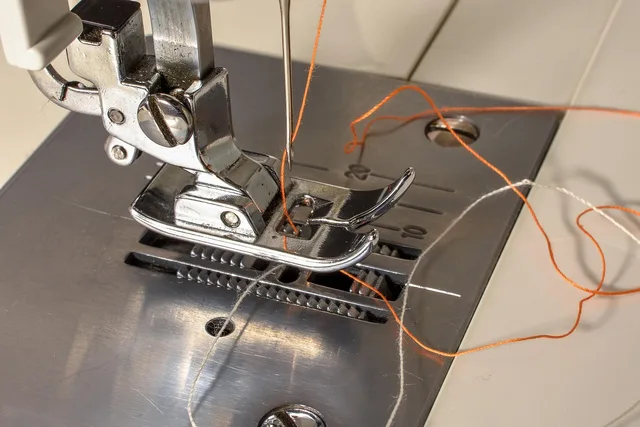
Measure from the center of the presser bar screw down to the bed with the presser foot lowered. Low shank is typically about 1/2 inch. High shank is typically about 1 inch. Proprietary systems ignore both figures.
Slant needle machines add another complication: the bar is angled. Singer slant shank models such as the 301, 401 and 500 use feet cut at that angle. A foot that fits geometrically may still present at the wrong angle.
Adapters exist and they work, with two caveats: they raise the foot slightly, which changes clearance under the needle bar, and they add a joint that can flex under load. A low shank snap-on adapter from Dritz is a common example.
The attachment families, with named examples and fit notes
The attachment families
| Family | Named real example | Job | Fit, price or limit | Beginner value |
|---|---|---|---|---|
| Straight and zigzag feet | Generic low shank presser foot; Singer 160992 Automatic Zigzagger | General sewing, zigzag conversion | The Singer 160992 fits many low shank straight-stitch machines; check the driving fork clearance | Essential |
| Zipper foot | Singer adjustable zipper foot; Janome snap-on zipper foot | Stitching close to a raised edge | The adjustable screw lets the foot sit on either side of the needle | Essential |
| Hemmer, various widths | Singer hemmer foot, low shank; Greist hemmer | Rolls and stitches a hem in one pass | Needs practice; vintage versions typically $10 to $25 used | High, once practiced |
| Binder | Singer binder attachment, low shank | Applies bias binding to an edge | Uses a folder; setup takes time; typically $15 to $40 | Medium, needs setup |
| Ruffler | Greist ruffler; Singer 160617 ruffler | Gathers or pleats at a set interval | Adjustable screw sets pleat depth; often $10 to $30 used | Low, spectacular, rarely needed |
| Buttonholer | Singer 160506 Buttonholer; Greist buttonholer | Cuts and stitches buttonholes | Model specific: low shank and slant shank versions differ; templates set length; typically $20 to $60 used | Medium, model specific |
| Walking foot | Singer 160743 Even Feed Foot; Brother SA140 walking foot; Bernina Walking Foot #50 | Feeds top and bottom layers together | Singer 160743 fits low shank; Bernina #50 fits Bernina; low shank reproductions typically $20 to $35, Bernina often $150 or more | High for thick or slippery work |
| Quilting guide | Dritz Magnetic Seam Guide; Clover 1/4-inch Quilting Foot with Guide | Spaces parallel rows | Dritz guide typically $6 to $12; Clover foot typically $15 to $25 | Medium |
| Edge stitch and blind hem feet | Generic edge stitch foot; Greist blind hemmer; Bernina Blind Hem Foot #5 | Consistent placement | Blind hem feet vary by shank; Bernina #5 fits Bernina machines | High for garment work |
| Darning and free-motion feet | Generic darning foot; Bernina Free-Motion Foot #24 | Feed dogs dropped | Requires feed dogs dropped; spring-loaded versions help | Specialist |
| Snap-on adapter | Dritz Low Shank Snap-On Adapter | Lets low shank machines use snap-on feet | Adds height; check clearance at full stitch width | Essential for modern feet |
| Zigzagger | Singer 160992 Automatic Zigzagger | Adds zigzag to a straight-stitch machine | Fits many low shank machines; check the driving fork and needle bar clearance | Low to medium, only if your machine lacks zigzag |
Attachments were patented, so they are traceable
These were competitive engineered products, and the paperwork survives. Patent documents are organized by subject, not keyword. The USPTO explains its move to the Cooperative Patent Classification system, developed jointly with the European Patent Office and now adopted widely.
Searching by classification finds the device family your attachment belongs to even when you do not know its name. A Greist ruffler and a Singer 160617 ruffler may sit in the same class.
Keyword searching fails on old attachments because period vocabulary differs from ours. Classification searching does not.
What is protected and what is not
Collectors sometimes think copying an old attachment design is prohibited. In general, a working device's functional design is not a copyright issue.
The Copyright Office circular on works not protected by copyright says ideas, procedures, processes, systems, and methods of operation fall outside copyright protection, even when described in a protected work.
Functional devices are the province of patents, and patents expire. That is why reproduction feet for hundred-year-old machines are made and sold openly. A new low shank hemmer foot or zipper foot is a common reproduction item.
Buy in this order
Start with the feet that solve problems you actually have. Confirm fit before buying a second one. You can treat sets as a source of two useful pieces plus spares. A sensible opening five for a low shank vintage machine is a snap-on adapter, a zipper foot, a hemmer, an edge stitch foot and a walking foot.
The first purchases article sets out a sensible opening five, and the station setup guide covers the fit test that should happen before anything is used on real fabric.
Common questions
Will a modern snap-on foot fit my vintage machine?
Are original attachments better than reproductions?
Why is my ruffler skipping?
Do boxed sets come with instructions?
In this guide
- Why the work surface matters as much as the sewing machine attachmentsAny sewing machine attachments comparison starts at the work surface: bed height, flatbed support, extension tables and lighting that shows the needle.
- Catalog gaps: small workshops now supply sewing machine attachmentsSmall workshops making reproduction sewing machine attachments for vintage machines, named by machine system, material and where each one sells.
- Reading patent markings before buying sewing machine attachments in 2027The opening five sewing machine attachments worth buying, what to defer, and how to read the patent and trademark markings stamped on old attachment boxes.
- Postage, condition and storage: the real cost of sewing machine attachmentsWhat sewing machine attachments really cost: singles versus boxed sets, postage on small metal parts, condition discounts and the storage nobody budgets for.
- 5 things about sewing machine attachments worth your timeHow to organize, label and fit-test a sewing machine attachment collection, with a written clearance procedure that runs the same way every single time.